Whether you’re a real estate agent showcasing properties, an interior designer presenting concepts to clients, or an architect visualizing floor plans, the ability to transform flat 2D blueprints into immersive 3D visualizations can be a game-changer for your business.
In this comprehensive guide, we’ll walk you through Easy-Peasy.AI’s Interior Design Visualization workflow template – a powerful tool that automates the entire process of converting 2D floor plans into 3D isometric maquettes, rendering photorealistic room images, and creating professional animated video tours.
What You’ll Create
By the end of this tutorial, you’ll be able to:
- Convert any 2D floor plan into a beautiful 3D isometric maquette
- Generate photorealistic renders for each room (living room, kitchen, bathrooms, patio, meeting rooms and more)
- Animate each room render with cinematic camera movements
- Merge all animations into a complete property video tour
The best part? The entire process is automated through Easy-Peasy.AI’s workflow system – simply upload your floor plan and let the AI handle the rest.
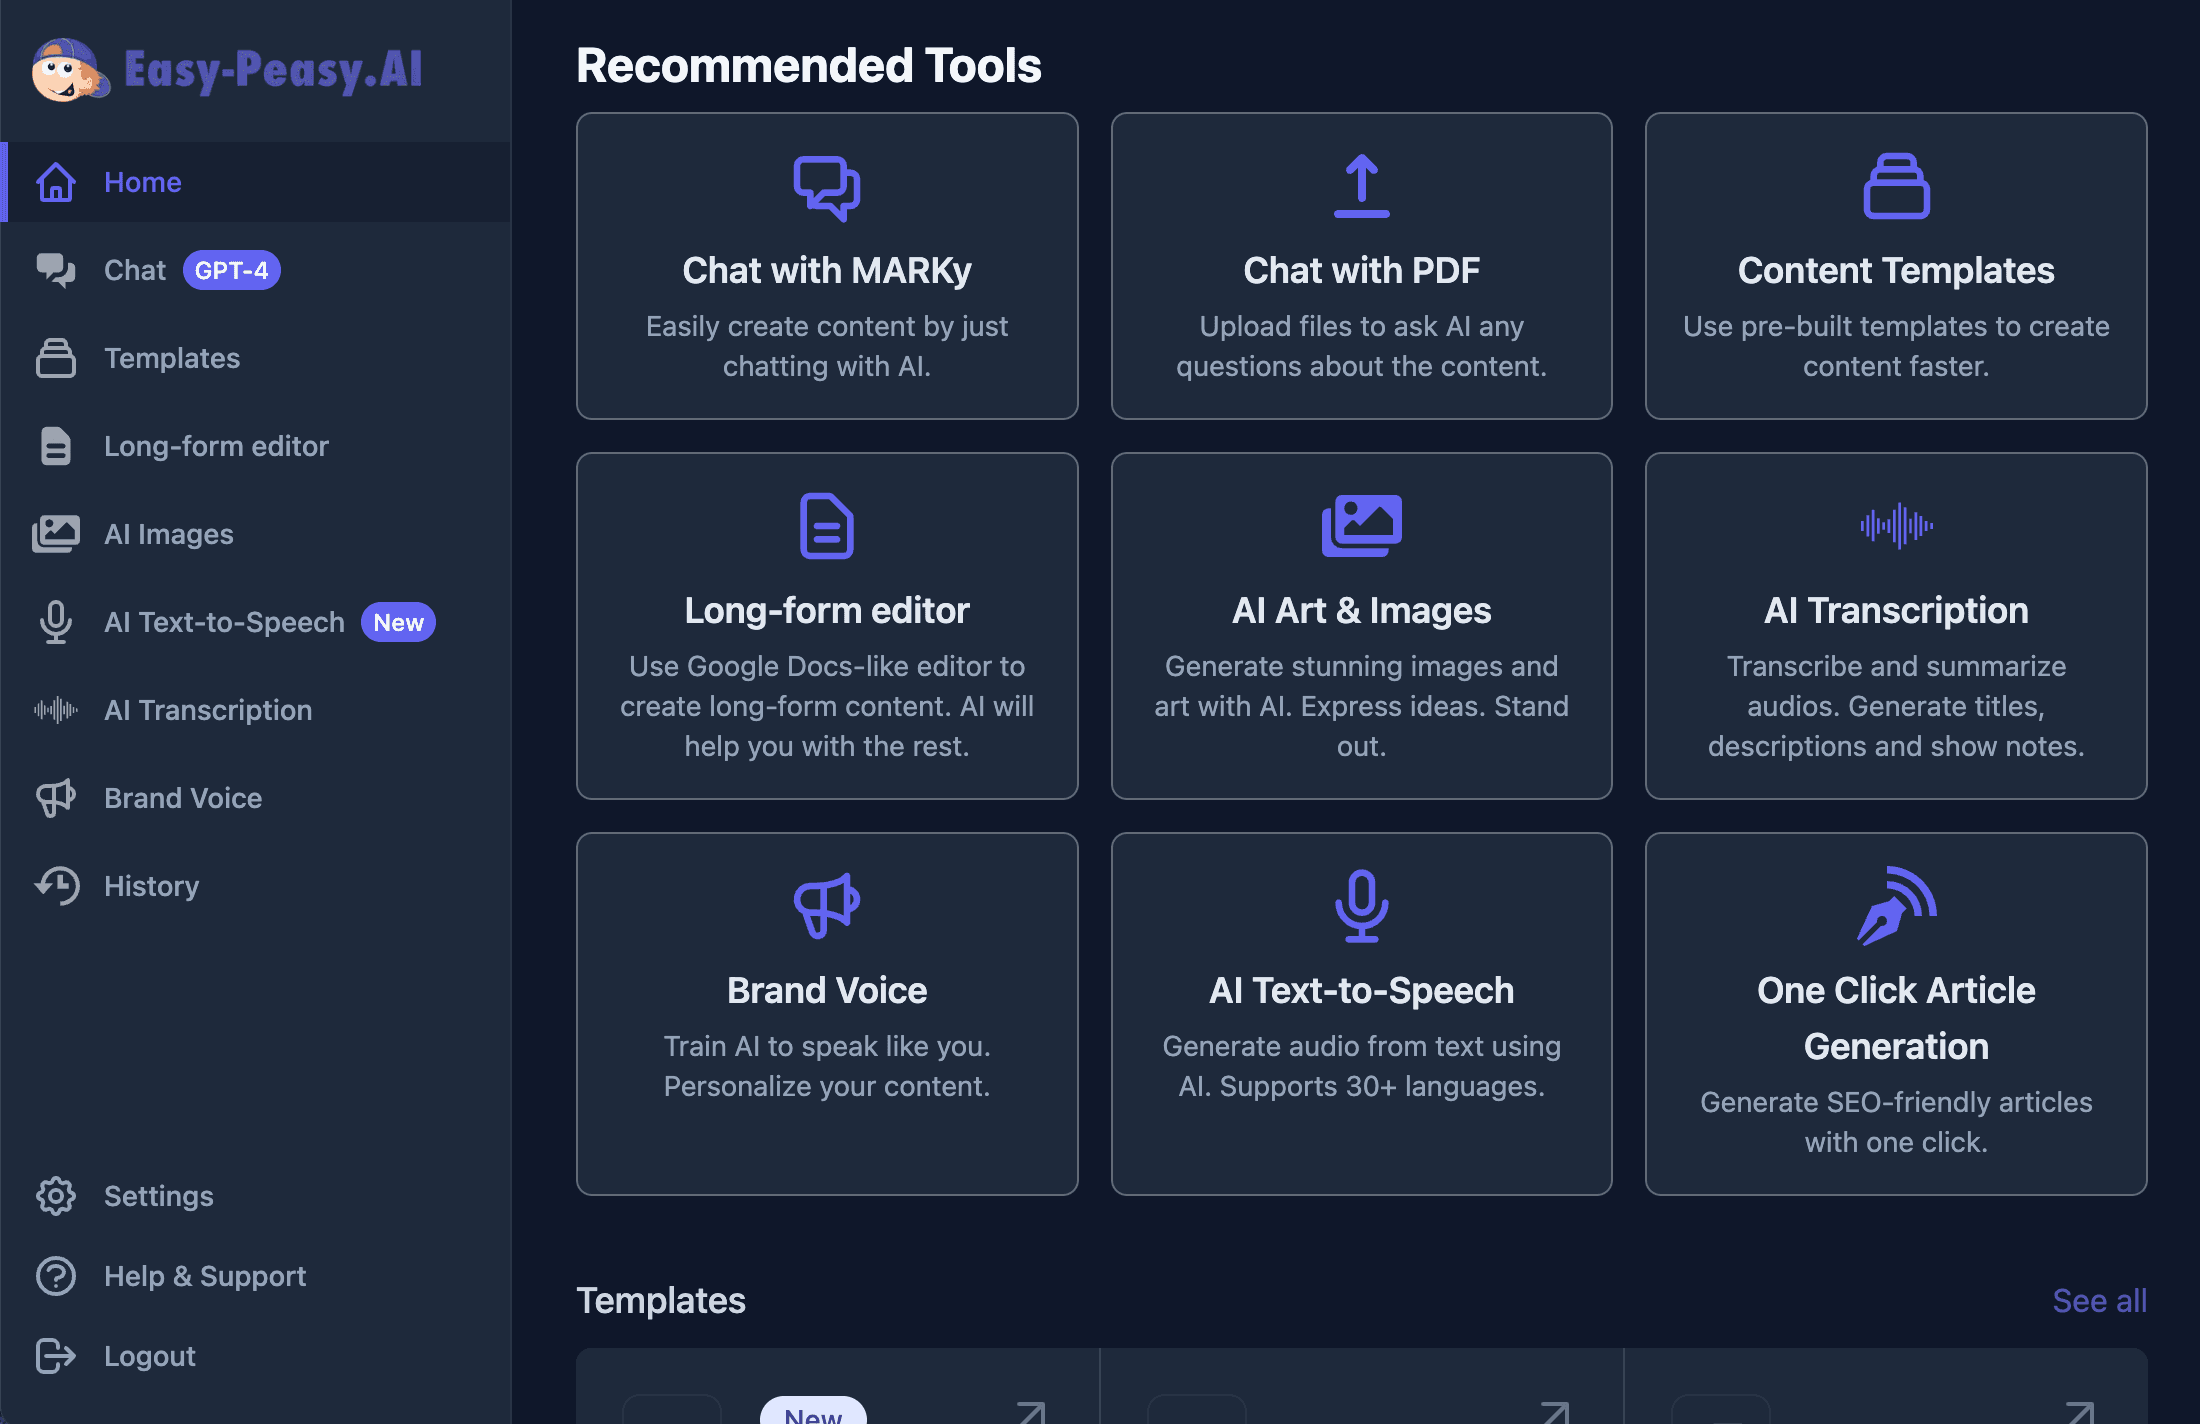
Getting Started: Accessing the Interior Design Visualization Template
Step 1: Navigate to Workflows
Log in to your Easy-Peasy.AI account and click on Workflows in the left sidebar. You’ll see the AI Workflow Builder page with options to create your own workflow or browse existing templates.
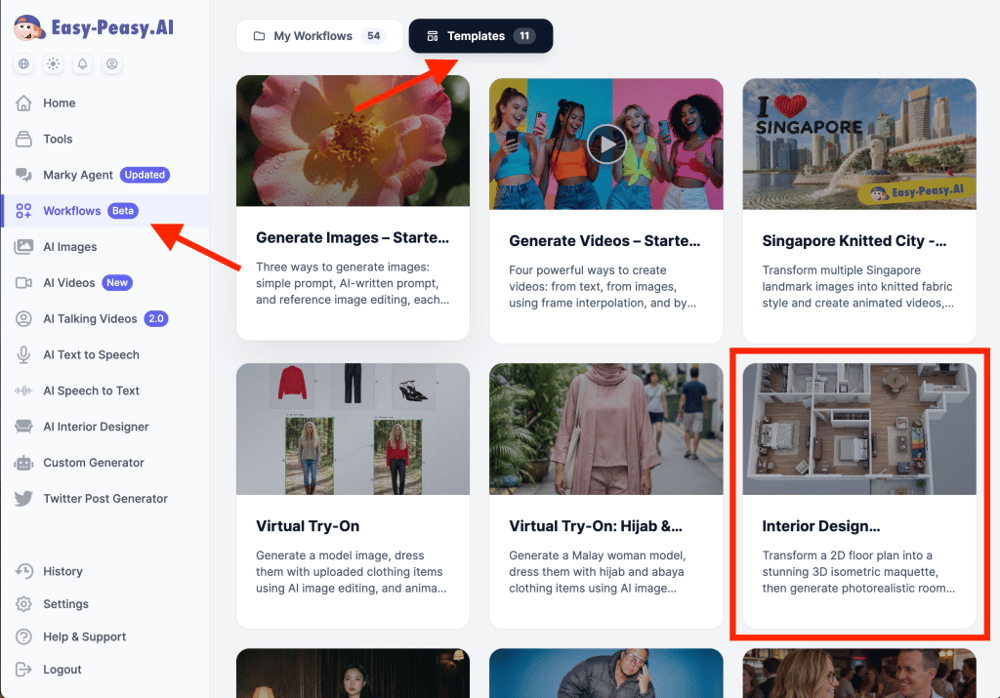
Step 2: Find the Interior Design Visualization Template
Click on the Templates tab to browse the 11 pre-built workflow templates. Scroll down until you find the Interior Design Visualization template. You’ll recognize it by its living room render thumbnail and the description: “Transform a 2D floor plan into a stunning 3D isometric maquette, then generate photorealistic room renders and create an animated video tour.”
Step 3: Preview and Clone the Template
Click on the template to open a preview. You’ll see the complete workflow laid out visually, showing how your floor plan will flow through each transformation stage. Click the Use Template button in the top right corner to clone this workflow to your account.
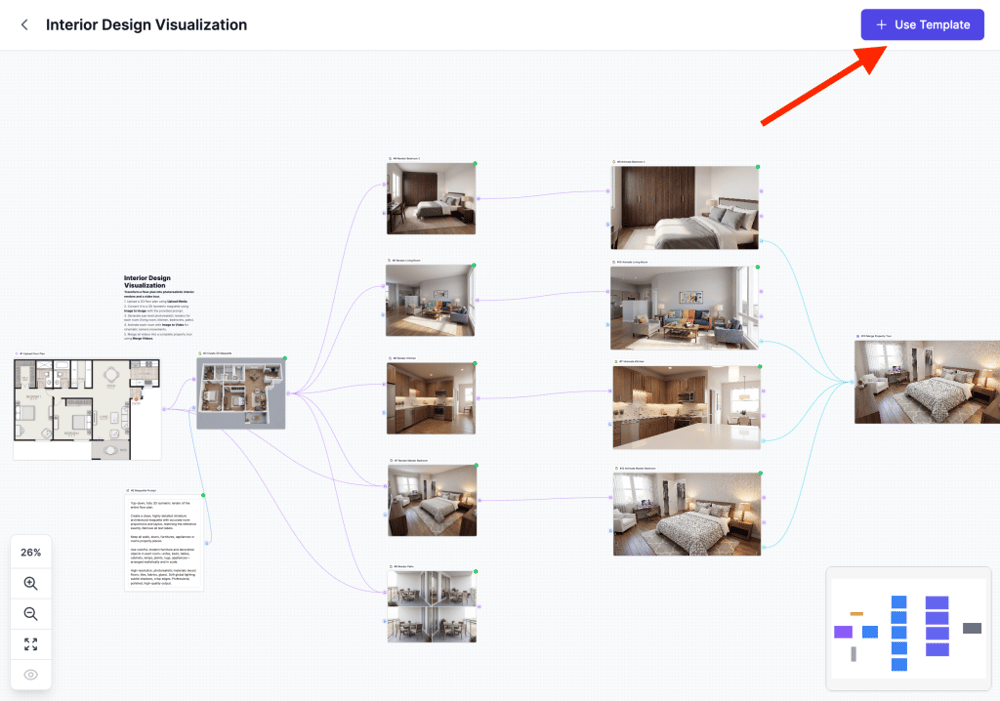
Understanding the Workflow: A Visual Pipeline
Once you’ve cloned the template, you’ll enter the workflow editor. Here’s where the magic happens. The workflow is organized as a visual pipeline with connected nodes, each performing a specific task.
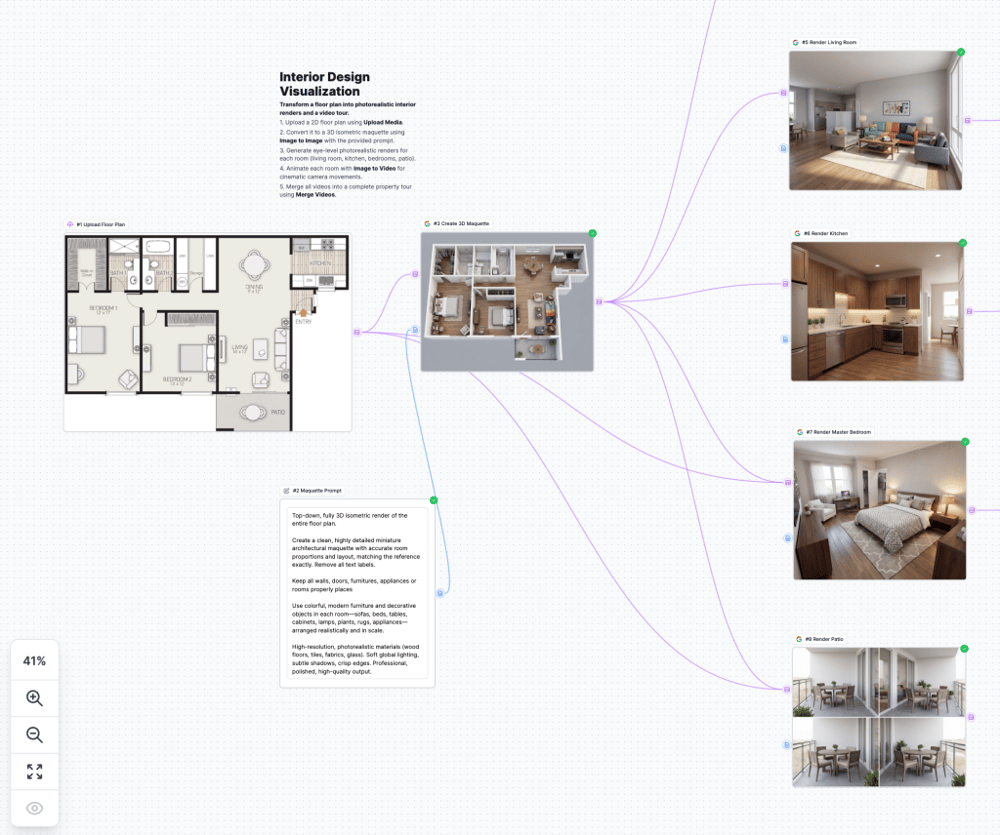
The 5-Step Process
The workflow description panel outlines the entire process:
- Upload a 2D floor plan using the Upload Media node
- Convert to 3D isometric maquette using Image to Image with a specialized prompt
- Generate photorealistic renders for each room (living room, kitchen, bedrooms, patio)
- Animate each room with Image to Video for cinematic camera movements
- Merge all videos into a complete property tour using Merge Videos
Step-by-Step Guide: Running the Workflow
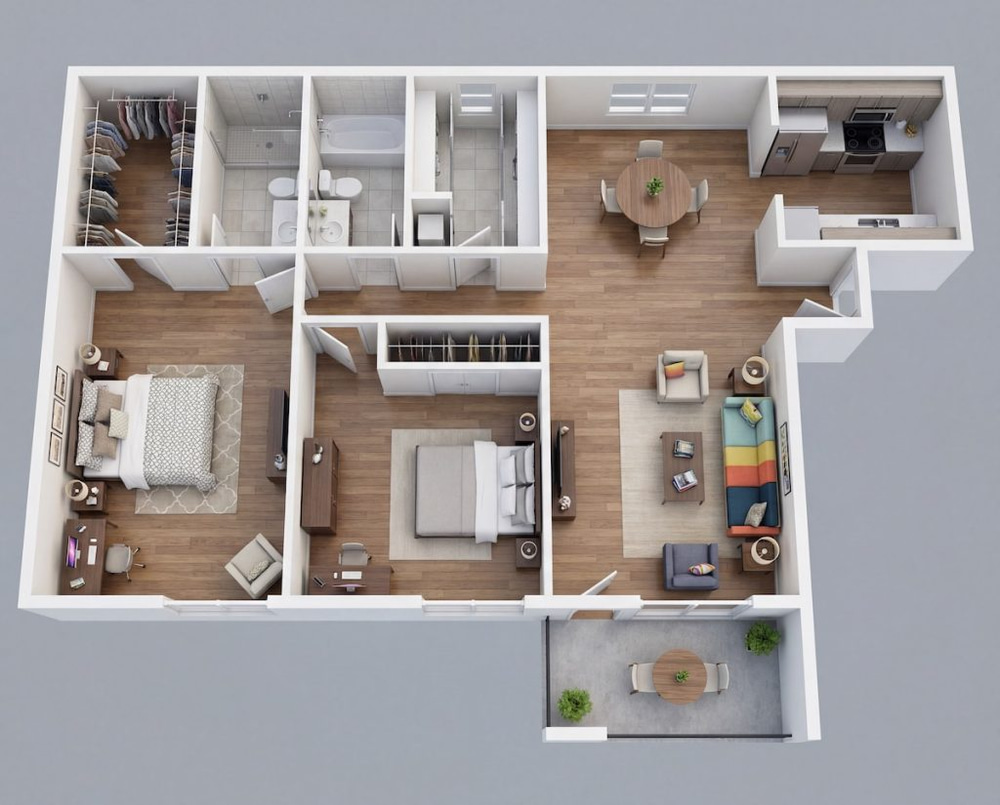
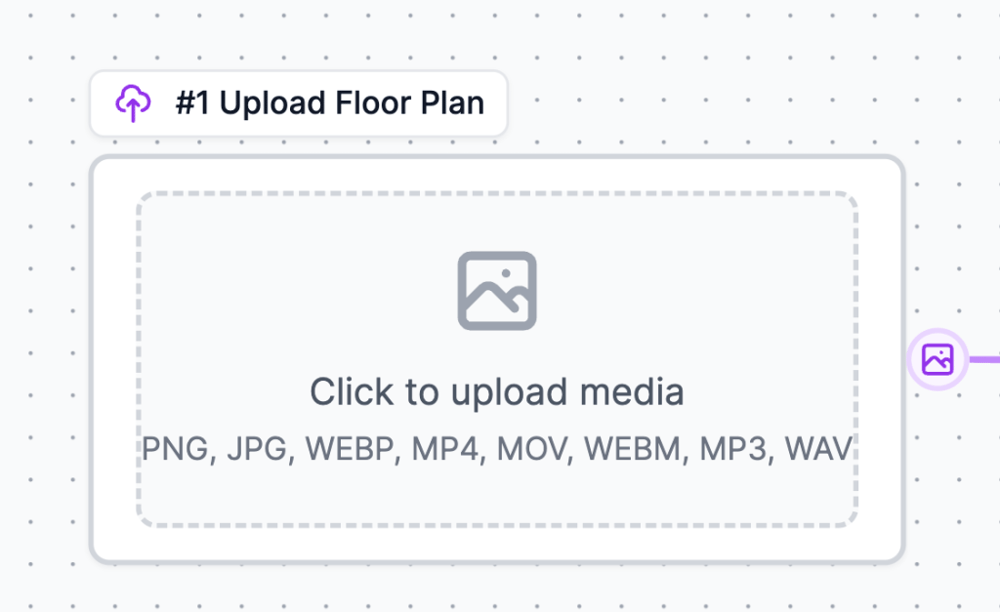
Step 1: Upload Your Floor Plan
The first node in the workflow is labeled #1 Upload Floor Plan. This is where you’ll add your 2D architectural blueprint.
To upload your own floor plan:
- Hover over the Upload Floor Plan node
- Click the X button on the existing sample image to remove it
- Click on the upload area that appears
- Select your floor plan image (supports PNG, JPG, WEBP formats)
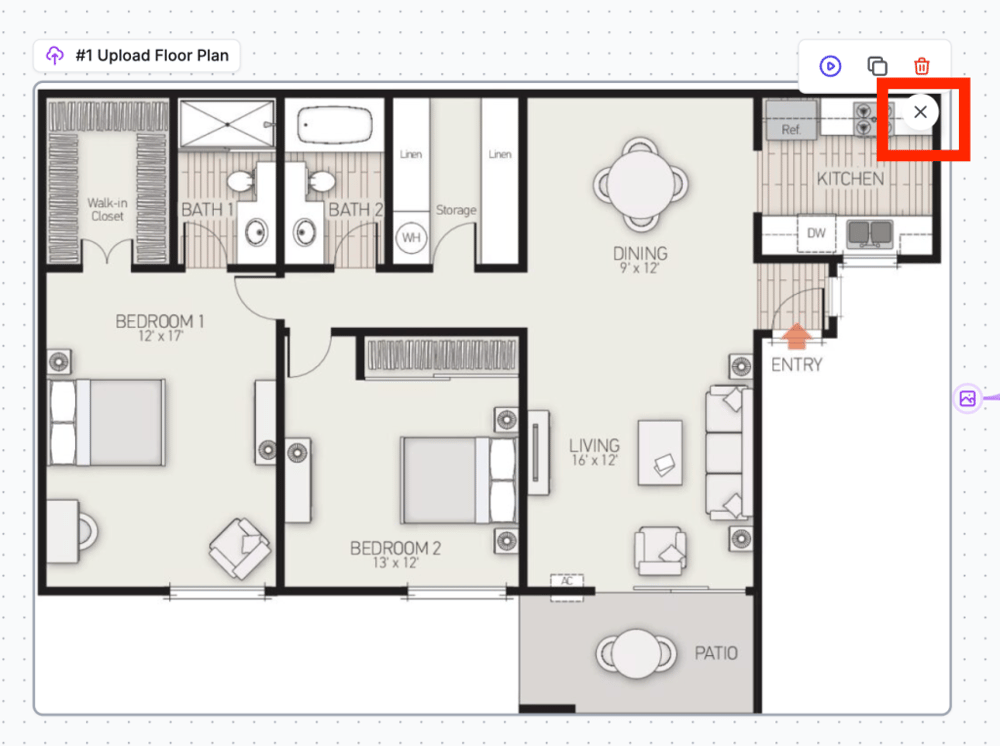
Pro Tip: For best results, use a clean, high-contrast floor plan with clearly defined rooms and minimal text labels. The AI works best with architectural blueprints that have clear room boundaries.
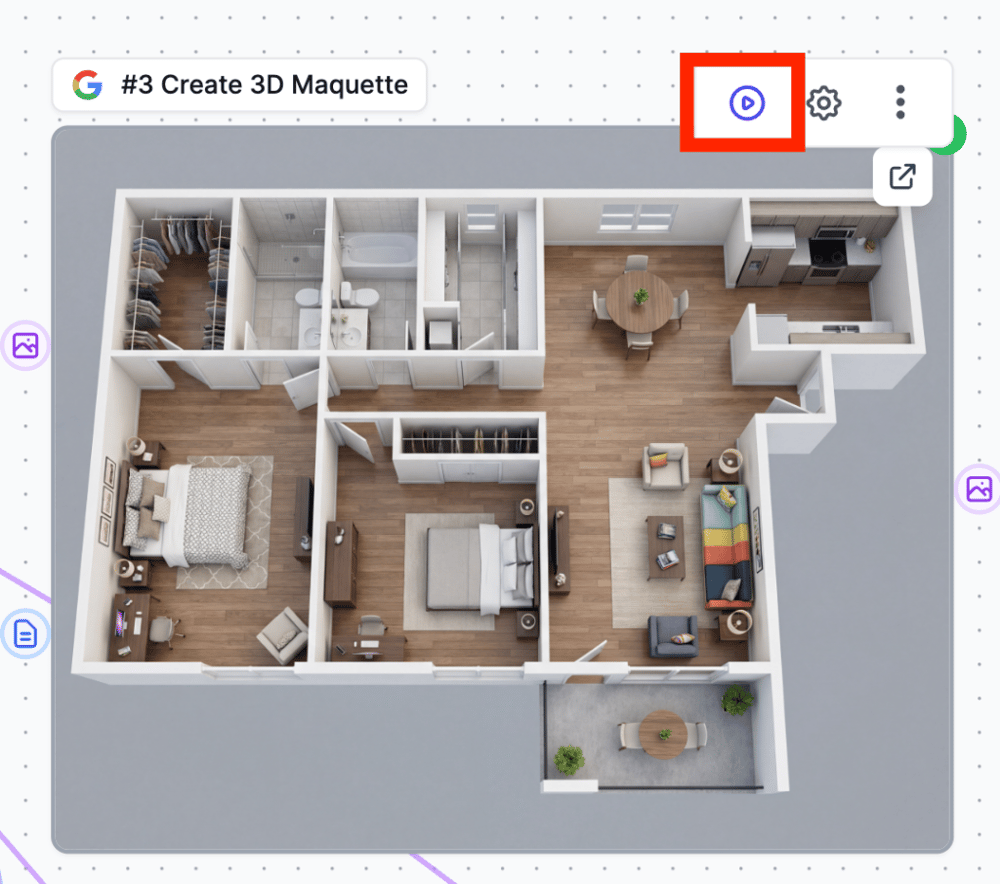
Step 2: The 3D Maquette Transformation
The second major node (#3 Create 3D Maquette) uses Easy-Peasy.AI’s Image to Image capabilities to transform your flat floor plan into a stunning 3D isometric visualization.
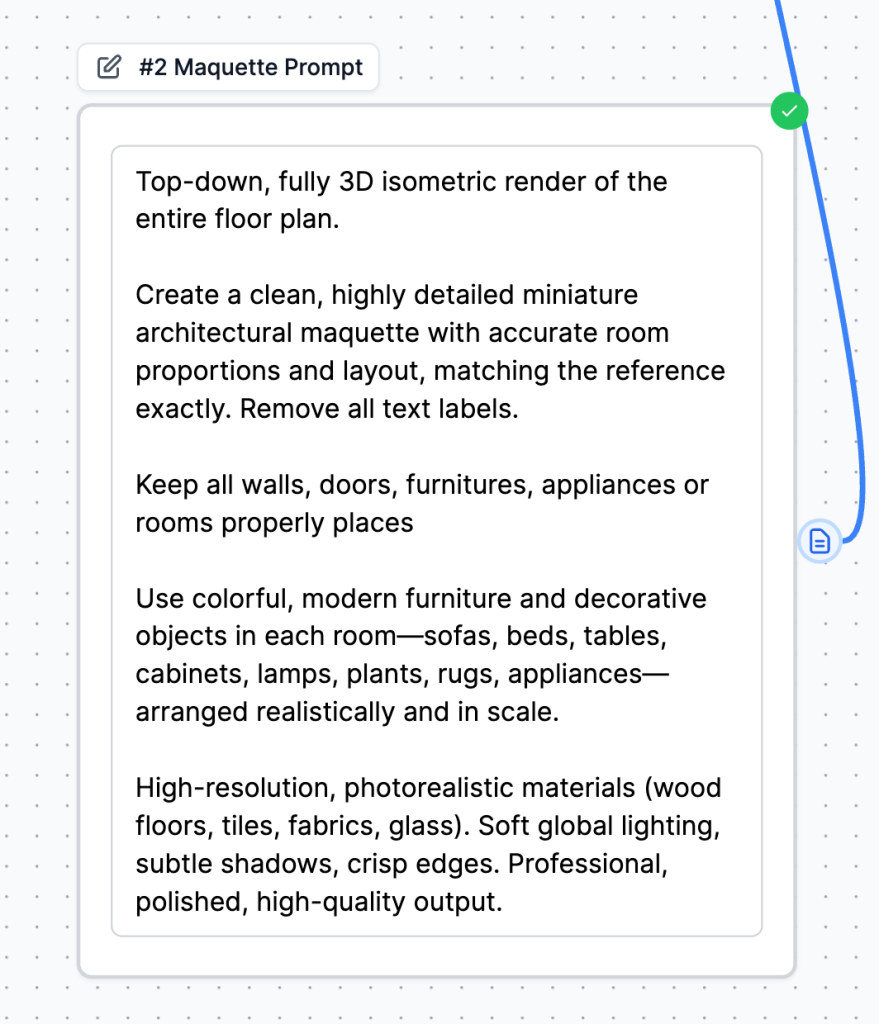
This transformation is powered by a carefully crafted prompt (stored in the #2 Maquette Prompt node):
“Top-down, fully 3D isometric render of the entire floor plan. Create a clean, highly detailed miniature architectural maquette with accurate room proportions and layout, matching the reference exactly. Remove all text labels. Keep all walls, doors, furnitures, appliances or rooms properly placed. Use colorful, modern furniture and decorative objects in each room—sofas, beds, tables, cabinets, lamps, plants, rugs, appliances—arranged realistically and in scale. High-resolution, photorealistic materials (wood floors, tiles, fabrics, glass). Soft global lighting, subtle shadows, crisp edges. Professional, polished, high-quality output.”
The result is a beautiful miniature architectural model showing your entire floor plan from an elevated angle, complete with realistic furniture, flooring, and lighting.
Step 3: Room-by-Room Renders
The workflow then branches out to create individual photorealistic renders for each room in your floor plan:
- #4 Render Bedroom 1
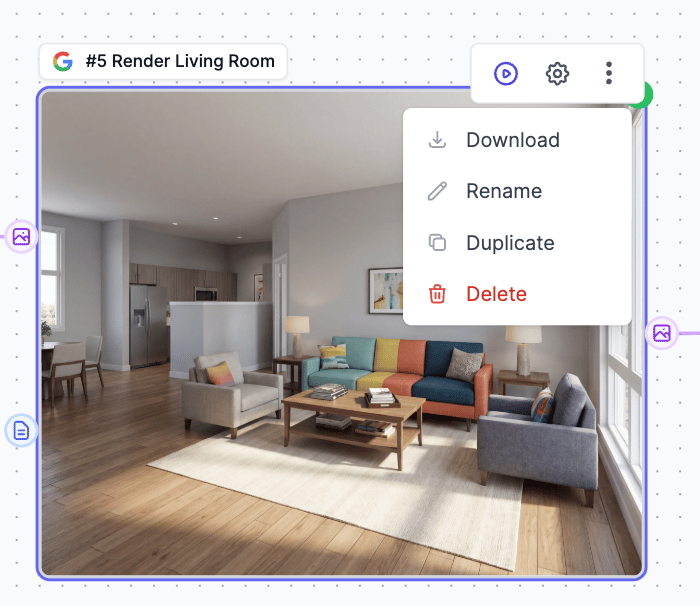
- #5 Render Living Room
- #6 Render Kitchen
- #7 Render Master Bedroom
- #8 Render Patio
Each render node generates an eye-level, photorealistic interior visualization showing how the room would look when fully furnished and decorated.
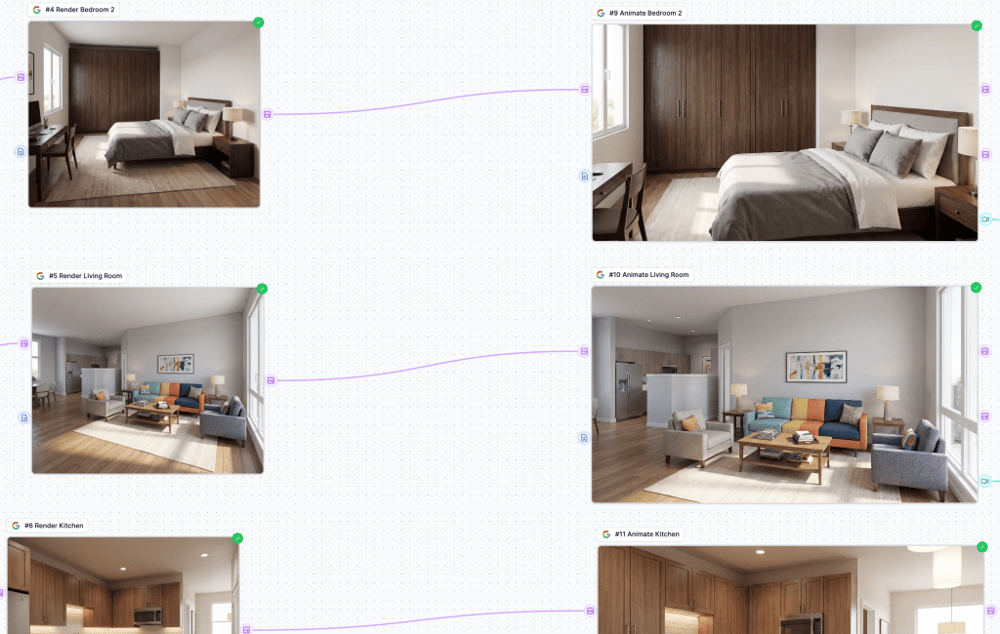
Step 4: Animate Each Room
Static images are impressive, but animated videos bring your visualizations to life. The workflow includes animation nodes for each rendered room:
- #9 Animate Bedroom 1
- #10 Animate Living Room
- #11 Animate Kitchen
- #12 Animate Master Bedroom
Each animation node uses Easy-Peasy.AI’s Image to Video feature to add cinematic camera movements – smooth pans, subtle zooms, and gentle reveals that make your room visualizations feel like professional architectural walkthroughs.
Step 5: Merge into Property Video Tour
The final node (#13 Merge Property Tour) takes all your individual room animations and combines them into a single, cohesive property video tour. This is perfect for:
- Real estate listings
- Property marketing materials
- Client presentations
- Social media content
Running Your Workflow
Once you’ve uploaded your floor plan, running the workflow is simple:
- Click the Save button in the top right corner to save your changes
- Click the Play icon (preview button) on any node to run the workflow from that point. We recommend starting with #3 Create 3D Maquette node and after it is done click Run one by one on each Image To Image node to generated the room images first. Once you are happy with room images you can proceed with video nodes. If you do not like some results you can regenerate node with adjusting your prompt.
- Wait for the AI to process each step – you can monitor progress in real-time
- Download your final video tour when complete. You can also download individual results from each node.
The entire process typically takes a few minutes depending on your floor plan complexity and the number of rooms being rendered.
Customization Tips
While the template works great out of the box, you can customize it for your specific needs:
Modify the Maquette Style
Edit the prompt in node #2 to change the furniture style, color palette, or overall aesthetic. Try adding terms like “minimalist,” “Scandinavian,” “industrial,” or “luxury” to match your target market.
Add or Remove Rooms
Click Add Node or Duplicate existing node to add more room renders for larger floor plans, or delete nodes for simpler layouts. The workflow is fully customizable to match your floor plan’s room count.

Change Animation Style
Adjust the animation prompts to create different camera movements – try slow zooms for dramatic effect or wider pans for spacious rooms.
Who Can Benefit from This Workflow?
Real Estate Agents
Transform basic floor plans into engaging property tours that help buyers visualize their future home before visiting in person. Check also – Listing AI Generator.
Interior Designers
Present design concepts to clients with photorealistic room renders that showcase your vision for their space.
Architects
Create compelling visualizations that bring architectural blueprints to life for client presentations and project proposals.
Property Developers
Generate marketing materials for properties still under construction – show potential buyers what the finished product will look like.
Content Creators
Create unique interior design content for social media, YouTube, or educational purposes.
Start Creating Today
The Interior Design Visualization workflow in Easy-Peasy.AI makes it incredibly easy to transform simple 2D floor plans into professional-quality 3D visualizations and animated video tours. What once required expensive software and hours of manual work can now be accomplished in minutes with AI automation.
Ready to try it yourself? Head over to Easy-Peasy.AI Workflows, find the Interior Design Visualization template, and start transforming your floor plans today.
Have questions or want to share your creations? Join our community and show us your AI-generated property tours!