You designed every pixel of your Webflow site — now give it a brain. With Easy-Peasy.AI Bots, you can add an AI chatbot to your Webflow website that answers visitor questions instantly, trained on your own content. It’s one script tag in your site’s custom code settings: paste, publish, done. No integrations marketplace, no backend, no code beyond copy-and-paste.
What Is the Webflow Chatbot Integration?
It’s a floating chat widget powered by an AI agent you train on your website, docs, and FAQs. Visitors click the bubble, ask anything, and get an answer in seconds — in your brand’s voice, from your actual content. The widget is a single deferred script, so it doesn’t interfere with your Webflow interactions, animations, or page speed.
Why Add an AI Chatbot to Webflow?
- Convert the traffic you worked for. Visitors with questions convert when answered immediately — not when they find your contact form.
- Perfect for agencies and SaaS. The classic Webflow crowd: portfolios, product marketing sites, client sites. Every one of them fields repetitive questions.
- Deliverable for client projects. Agencies can drop a trained support bot into a client site as a value-add — it takes minutes per site.
- Design stays yours. Position, size, icon, and color are configurable so the widget matches the design system you sweated over.
What You’ll Need
- An Easy-Peasy.AI account with a bot created and trained on your content
- A Webflow site with a paid site plan (Basic or above) — Webflow only includes custom code on paid site plans
How to Add the Chatbot to Webflow (Step-by-Step)
Step 1: Create and train your AI agent
Create your bot, then add knowledge: paste your site URL, upload documents, or write Q&As. Refine its instructions and test in the Playground.
Step 2: Copy your embed code
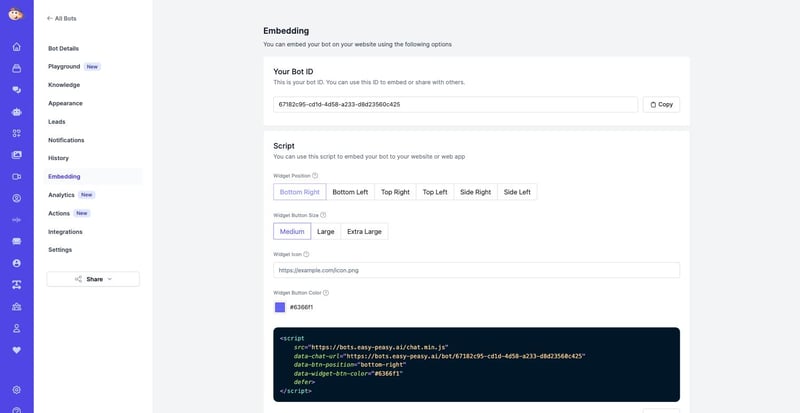
Open the bot’s Embedding page, customize the widget (position, button size, brand color, icon), and copy the script — a single <script> tag with your bot’s ID.
Step 3: Open your site’s Custom Code settings
In Webflow, open your site’s Site settings → Custom code tab. You’ll see two fields: Head code and Footer code.
Step 4: Paste into Footer code and save
Paste the widget script into Footer code (it’s injected before </body> on every page — the right place for chat widgets) and click Save changes.
Step 5: Publish your site
Custom code only goes live on publish — click Publish in Webflow, then open your live site. The chat bubble is in the corner of every page, ready to answer.
Alternative: Inline Chat With an Embed Element
For a dedicated support or FAQ page, place the chat inline instead of floating:
- In the Designer, drag an Embed element (under Advanced) onto your page
- Paste your bot’s iframe snippet from the Embedding page:
<iframe src="https://bots.easy-peasy.ai/bot/YOUR-BOT-ID?mode=embedded" width="100%" height="600" allow="microphone"></iframe>
- Style the wrapper like any Webflow element, then publish
The Embed element also requires a paid site plan, and the iframe inherits your layout — set the width to 100% and control sizing from the parent div like you would any component.
Tips for a Great Webflow Chatbot
Match your design tokens
Set the widget button color on the Embedding page to your primary brand color so the bubble looks like part of the design system, not a third-party sticker.
Watch for fixed-position collisions
If your design uses fixed CTAs or cookie banners in the bottom corners, pick a widget position that doesn’t overlap — there are six to choose from, including side placements.
Train it on your product and pricing pages
For SaaS marketing sites, “how much is it” and “does it integrate with X” are the questions that gate signups. Make sure the bot nails them.
Use one bot per client
Agencies: create a separate bot per client project, trained on that client’s content — each gets its own embed snippet and its own conversation history.
Frequently Asked Questions
Does this work on Webflow’s free plan?
No — Webflow includes custom code (both site-wide code and Embed elements) only on paid site plans. That’s a Webflow restriction that applies to every chat widget.
Will it break my interactions or animations?
No — the widget is an isolated, deferred script that renders in its own layer. Your Webflow interactions run untouched.
Why isn’t the widget showing after I saved the code?
Custom code goes live only after you publish the site. Save in Site settings, then hit Publish.
Can I show it only on some pages?
Yes — instead of site-wide Footer code, paste the script into an individual page’s settings (Before </body> tag field), or use the inline Embed element on specific pages.
How do I remove it?
Delete the snippet from Site settings → Custom code, save, and republish.
Can the same bot work on other platforms too?
Yes — one agent, every channel: Wix, Squarespace, Shopify, email, Telegram, and more.
Ship the Site With Answers Built In
You’ve built the site — now make it answer for itself. Create your AI agent, copy the snippet from the Embedding page, paste it into Footer code, and publish. Your Webflow site just hired its first support rep.