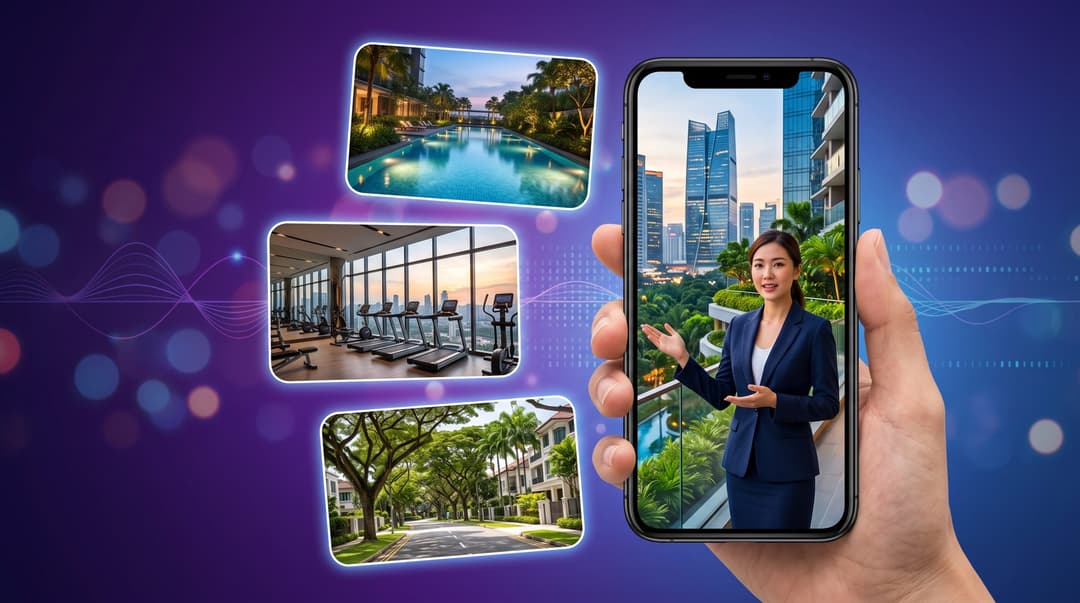
Selling a new development is the hardest video brief in real estate: the building doesn’t exist yet. There is nothing to film, no drone shot to fly, no show unit to walk through — just a folder of renders from the architect and a fact sheet from the developer. With the AI Video Generator you can turn exactly that folder into a finished 30-second launch film, complete with a presenter, camera movement and a voice-over, without a crew or a shoot day.
This guide walks through a real 30-second property launch video start to finish — the reference images, the timestamped prompt, the settings, the credit cost, and the mistakes worth avoiding. Here is the finished result, generated in a single take from five still images:
A 30-second launch film for a fictional development, generated from five reference images. Voice-over and music are generated with the video — there is no separate edit. Turn the sound on.
Why New Launches Need a Different Kind of Video
A normal listing video has a big advantage: the property is there. You point a camera at it. For a new launch, pre-construction condo or off-plan project, everything you have is hypothetical:
- Artist’s impressions — a handful of exterior and amenity renders, usually 4 to 8 images
- A site plan and a location map
- A fact sheet — unit mix, floor areas, block count, transport links, nearby schools
- No footage at all, and often no show gallery for months
The traditional answer is a 3D animation studio: four to six weeks, and a five-figure invoice for a 30-second film. That timeline does not fit a launch weekend, and it does not fit the twenty small edits you will want once the developer’s marketing team sees the first cut.
An AI video model changes the shape of the problem. Instead of rebuilding the development in 3D, it animates the renders you already have — adding camera movement, moving clouds, water ripples, distant people, and a presenter who speaks — while keeping the architecture exactly as the architect drew it.
What You Need Before You Start
The whole job takes about twenty minutes once you have these five things ready:
- A hero aerial render — the establishing shot, ideally daytime
- An amenity render — the pool, sky deck or clubhouse
- A context image — the walking route to transport, the park, the street approach
- A night or blue-hour render — the closer, because lit windows sell
- A presenter image — a photo of the listing agent, or a generated one (more on this below)
That is it. Five stills become thirty seconds of film.
Step 1: Create Your Presenter
A face makes a property ad feel like a conversation instead of a slideshow. You have two options.
If the listing agent is available, use a clean, well-lit photo of them — three-quarter body, plain background, neutral expression. The model will preserve their identity across every shot.
If they are not available, or the project has no assigned agent yet, generate a presenter. Ask Marky for a character reference image and be explicit that the person is fictional:
Create a photorealistic 16:9 character reference image of a completely
fictional property agent, not resembling any real person. A confident,
warm woman in her early 30s, polished professional appearance, natural
makeup, shoulder-length dark hair, approachable smile, standing
three-quarter body facing camera. Tailored plain red blazer, white
blouse, slim black trousers, holding a dark tablet at waist height.
Premium modern condominium sales gallery, warm natural daylight,
shallow depth of field. Accurate anatomy and hands, generous negative
space, neutral stable pose suitable as a consistent reference character
for AI video. No readable signage, no watermarks, no distorted text.
Two details in that prompt are doing real work. “Neutral stable pose” and “generous negative space” make the image usable as an identity anchor — a dramatic pose or a tight crop gives the video model less to work with. And “completely fictional” matters legally: a synthetic presenter needs no model release, no talent fee and no renewal.
Step 2: Write a Timestamped Prompt, Not a Description
This is the part that separates a usable launch film from thirty seconds of drifting drone footage.
Most people write an AI video prompt like a wish: “a cinematic video of a beautiful modern condominium with a pool and an agent talking about it.” The model has to invent the structure, and thirty seconds is a long time to improvise. You get a pretty but shapeless clip.
Instead, write a beat sheet — the same thing a director hands a crew. Break the 30 seconds into blocks of four to five seconds, and for each block specify four things: which reference image it uses, what the camera does, what changes in the frame, and what is said.
Here is the structure that works for a property launch, and what each beat is actually for:
| Time | Beat | Its job |
|---|---|---|
| 00:00–00:04 | Opening | Establish scale and setting. Slow drone push on the hero aerial. |
| 00:04–00:08 | Presenter | Put a human face on it. Medium shot, gentle push-in, first spoken line. |
| 00:08–00:12 | Connectivity | Answer “where is it?” — the walk to transport, the road access. |
| 00:12–00:16 | Lifestyle | Answer “what is it like to live here?” — pool, deck, greenery. |
| 00:16–00:21 | Homes | The unit mix. Presenter returns beside the architectural model. |
| 00:21–00:26 | Value | The reason to act now. Carried by pacing and voice-over, not graphics. |
| 00:26–00:30 | Finale | Blue-hour hero shot, call to action, clean space for your end card. |
Written out, a single beat looks like this:
00:00-00:04 - OPENING
Animate Image 2 with a slow drone push, gentle descent and slight
clockwise orbit toward the towers. Add realistic cloud, foliage and
water movement only. Do not alter or invent buildings.
Audio VO only: "Discover greener living at Parkline Gardens Residences."
Notice “Do not alter or invent buildings.” In property marketing that line is not stylistic — it is compliance. Renders are approved marketing material, and a model that helpfully adds an extra tower or widens the pool has produced a misrepresentation you cannot publish.
And here is how those beats actually landed in the finished video:
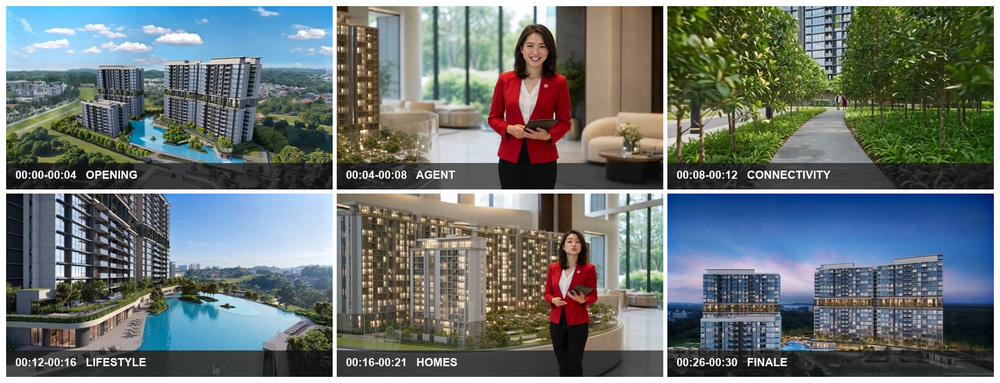
Six of the seven beats, pulled straight from the finished 30-second file. Each one matches the timestamp it was written for.
Let Marky Write the Beat Sheet for You
You do not have to compose 4,000 characters of shot direction by hand. Paste the developer’s fact sheet into Marky and ask for the prompt:
Here is the fact sheet for a new condominium launch: [paste it]

Write a detailed timestamped prompt for the Seedance 2.5 video model to
generate a 30-second 16:9 launch film. I will upload 5 reference images:
the agent, a daytime hero aerial, the pool, the walking route to the
station, and a night view. For each 4-5 second beat specify the
reference image, camera movement, what moves in frame, and the
voice-over line. Keep it under 5,000 characters.
Two constraints in that request matter. Naming which image is which lets you write Animate Image 2 instead of describing the shot from scratch every time. And the 5,000-character limit is a real cap in the Video Generator for Seedance 2.5 — a first draft will usually blow past it, so ask for the limit up front rather than trimming later.
Step 3: Ban On-Screen Text Completely
This is the single most useful thing in this guide, and it is counter-intuitive.
Your instinct is to ask the model for the project name, the unit sizes and a phone number burned into the video. Do not. Today’s video models still render text as convincing-looking gibberish. They will also faithfully reproduce — and mangle — any watermark or label baked into your source renders.
Here is the bottom-right corner of the final frame of the demo video, at full magnification. The source render carried a small “Artist’s Impression” watermark, and the model reproduced its shape without its meaning:
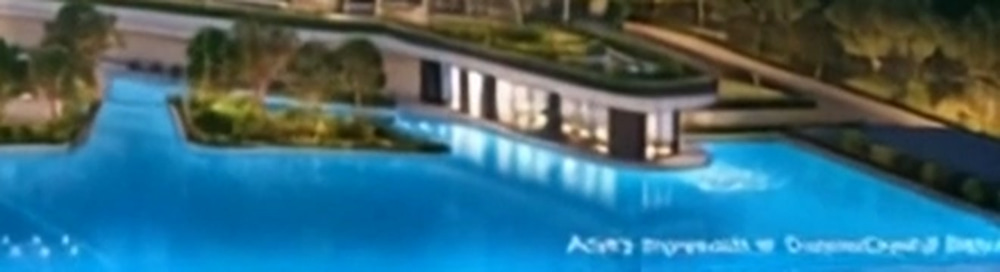
Real output from the demo video. This is what AI-generated text looks like at full size — and this survived a prompt that explicitly banned watermarks.
So the rule is: the model makes pictures and sound; you make titles. Add every word afterwards in the video editor, where you control the font, the spelling and the legal disclaimer — Step 6 below walks through exactly that. Put this block near the top of your prompt:
CRITICAL: Generate NO visible text or logos anywhere. No titles,
captions, subtitles, transcripts, labels, letters, numbers, prices,
signs, brand names, badges, watermarks, interface elements,
disclaimers, phone numbers or QR codes. Never render spoken words on
screen. Remove, obscure or leave unreadable any existing text or logo
in the references. Leave clean negative space so all titles, facts,
logos and contact details can be added later in editing.
Three parts of that are easy to forget. “Never render spoken words on screen” stops the model helpfully subtitling its own voice-over. “Remove, obscure or leave unreadable any existing text or logo in the references” targets watermarks in your source renders. And “leave clean negative space” is a positive instruction rather than a prohibition — it tells the model to compose shots with room for the titles you will add, which is why the demo’s final shot has an empty sky and an uncluttered lower right.
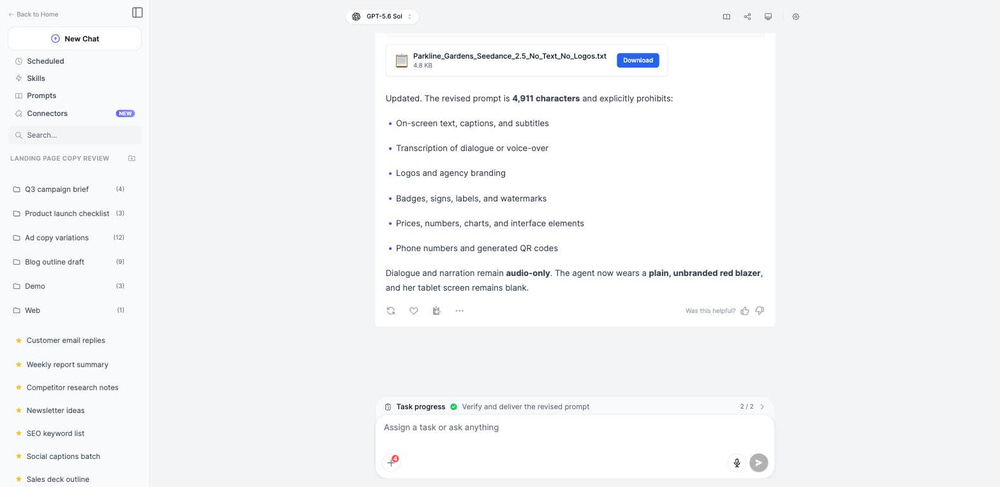
Asking Marky to strip text and branding out of an existing prompt — it rewrites the whole thing and keeps you under the character limit.
Step 4: Upload Your References and Set the Shot
Open the AI Video Generator and click Add media under References. Reference images are typed, and the type is what tells the model how to treat each one:
- Character — your presenter. This is the identity lock.
- Object — the building, the pool, the site. These lock the architecture.
- Image — general style and mood guidance.
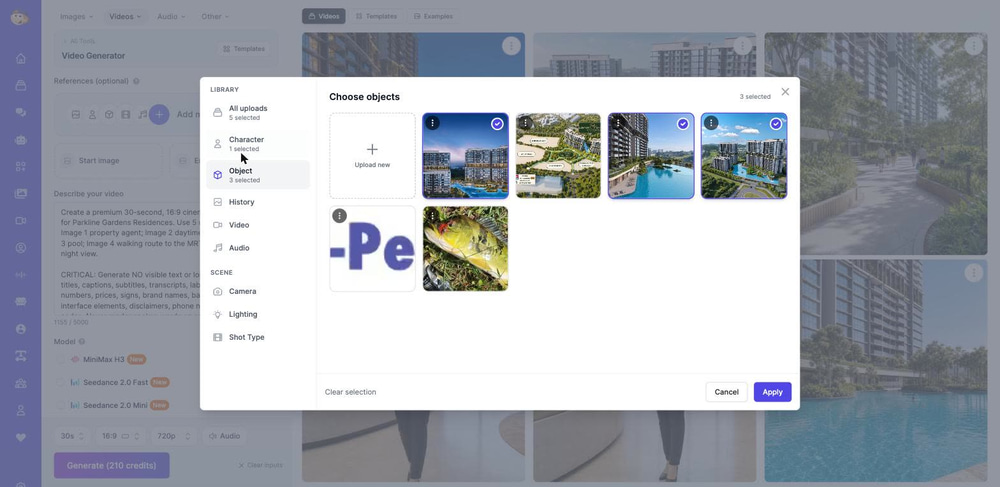
You can attach up to 30 reference images, which is far more than a launch film needs — five to eight is the sweet spot. Beyond that the model has to reconcile too many competing looks.
Once references are attached, the model list switches to its Reference variants automatically. Pick Seedance 2.5 Turbo Reference, then set the shot: 30s, 16:9, 720p, with Audio on.
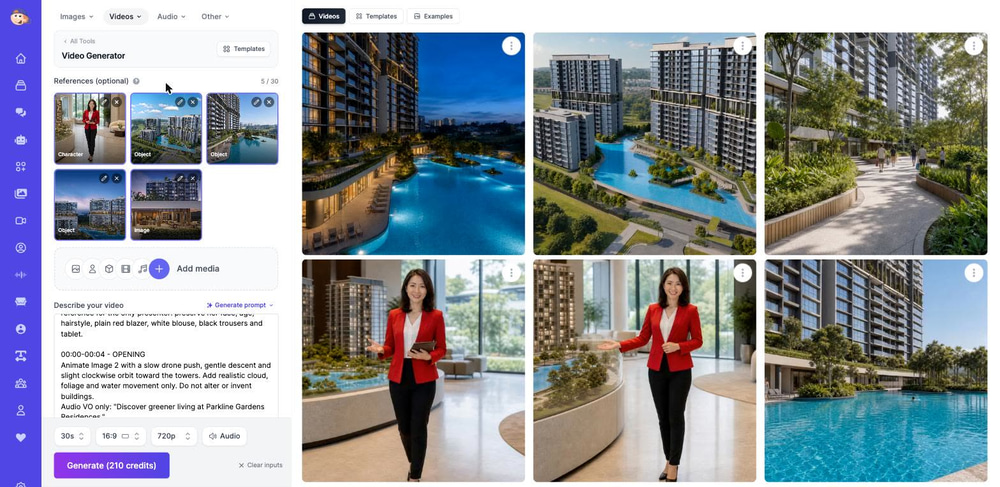
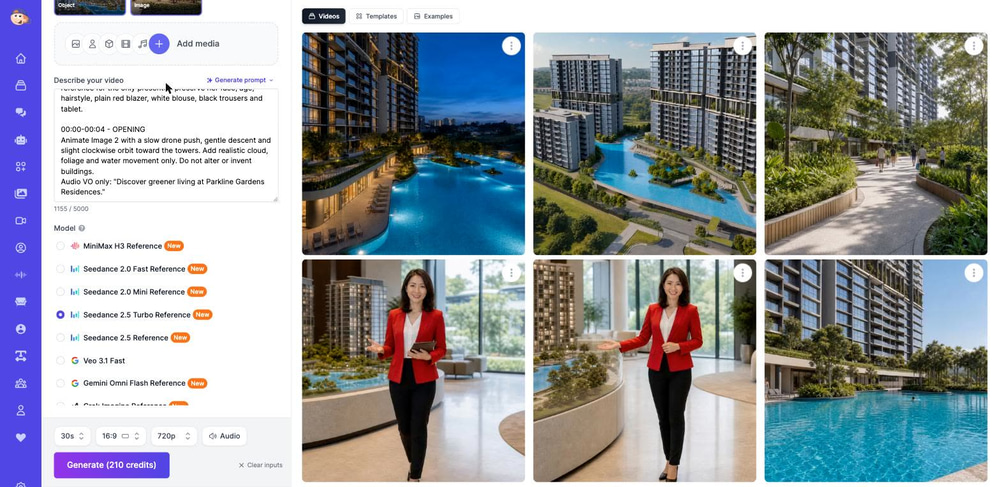
These are the exact settings behind the demo video at the top of this post:
| Setting | Value |
|---|---|
| Model | Seedance 2.5 Turbo Reference |
| Length | 30 seconds, generated as one continuous take |
| Aspect ratio | 16:9 |
| Resolution | 720p |
| Reference images | 5 (1 character, 4 property renders) |
| Prompt length | 4,850 characters (5,000 max) |
| Audio | Voice-over and music generated with the video |
| Cost | 210 credits |
The number worth pausing on is one continuous take. The model is not stitching seven clips together — it generates the whole 30 seconds as a single piece, which is why the lighting, the colour grade and the presenter stay consistent from the first frame to the last.
Step 5: Choosing Between the Seedance 2.5 Tiers
Two tiers can do this job, and the cheaper one is also the higher-resolution one, which surprises people:
| Model | Credits/second | 30s at 720p | Resolutions |
|---|---|---|---|
| Seedance 2.5 Turbo Reference | 7 | 210 credits | 720p, 1080p |
| Seedance 2.5 Reference | 12 | 360 credits | 480p, 720p |
Start with Turbo. It is roughly 40% cheaper per second and it is the only one of the two that reaches 1080p — 30 seconds at 1080p costs 221 credits. Move up to the standard tier only if Turbo struggles with a particularly complex shot; for animating architectural renders, it rarely does.
Both tiers require a paid plan. If you are on the Free plan, Seedance 2.5 will be locked in the model list.
Step 6: Add Your Titles and Captions in the Video Editor
Step 3 told you to keep every word out of the generated video. This is where the words go back in. The AI Video Editor is where a raw 30-second take becomes a finished ad.
Getting your video onto the timeline
There is no “edit” button on the video itself — you start from the editor side:
- Open the AI Video Editor and click New Project.
- Click Import in the media panel to open the Media Gallery.
- On the Videos tab you will find everything you have generated. Pick your launch film and click Add to Timeline.
The Upload button beside it accepts your own files too — video, images and audio — so the developer’s existing sizzle footage or a licensed music bed can sit on the same timeline.
Titles
Click Text in the top bar. A five-second text clip drops onto a Text track at the playhead, and the left panel becomes Clip Properties:
- Font — eight faces, including Playfair Display for a premium serif look and Bebas Neue for bold property-agency caps
- Size, Weight, and twelve Colors
- Position (top, center, bottom), Align, and an Offset slider — this is what you use to drop the title into the negative space you asked the model to leave
- Background — None, Shadow or Box, for legibility over a bright sky or pool
- Entrance Animation — None, Fade or Spring — plus fade in and fade out sliders
Drag the clip along the timeline to time it, and pull either edge to change how long it stays on screen. This is where the project name, the unit sizes, the price and your contact details belong: spelled correctly, in your own typeface, every single time.
Captions
Because Seedance generates the voice-over as real speech, the editor can transcribe it. Click Captions in the top bar, tick the clips you want, and pick a language — or leave it on Auto-detect, which covers 30 languages.
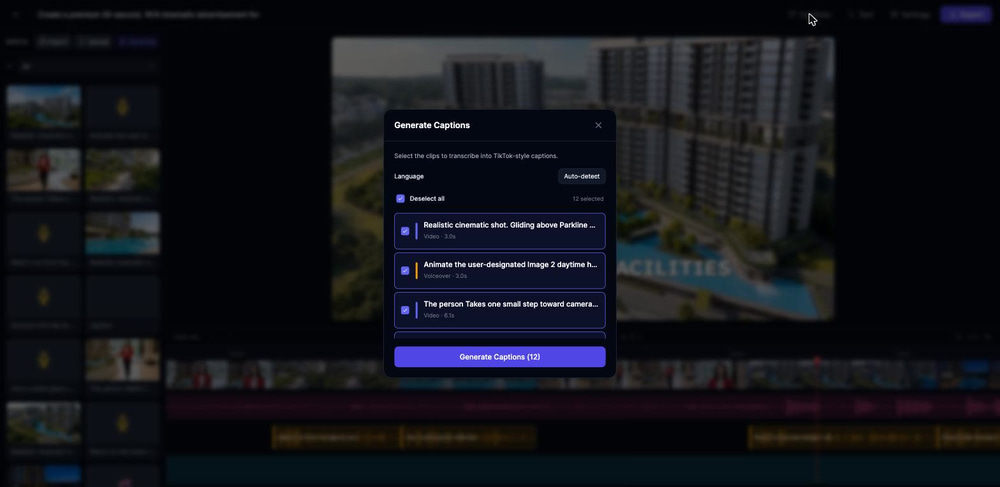
Transcription runs on Whisper with word-level timestamps and costs 1 credit per clip. What comes back is not a flat subtitle track — it is TikTok-style captions where the current word highlights as it is spoken:
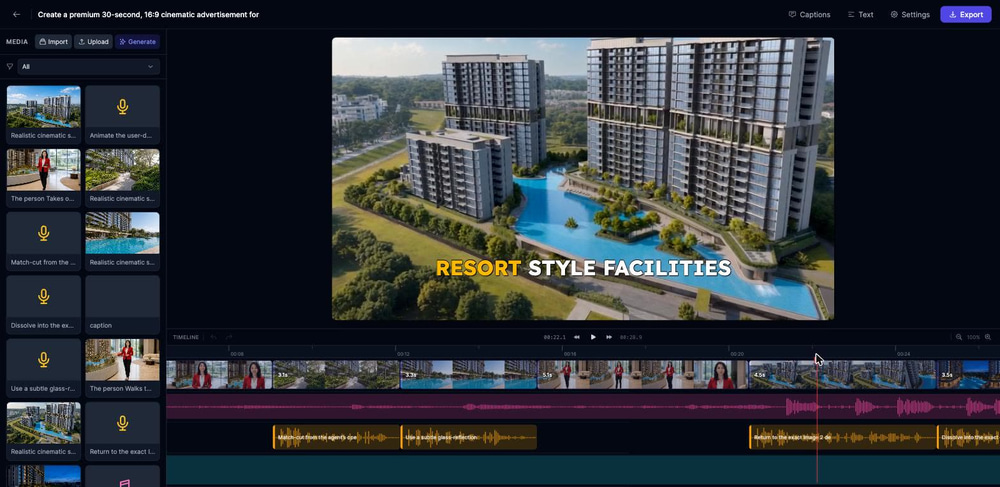
Select the caption clip and you get six presets — Viral, Hormozi, Wrap, Faceless, Classic and Minimal — plus position, font size, background, highlight colour, and a words per page slider (1 to 8, default 4) that controls how much text sits on screen at once.
If the transcription mishears a name — and with invented development names it sometimes will — click Edit caption text. You get every line with its start and end time, plus find-and-replace, so correcting a project name across the whole video is one operation.
This matters more than it sounds. Most property video on social plays on mute. Captions are what make the voice-over you paid for actually land.
Exporting
Hit Export and choose 1080p (Full HD) or 4K (Ultra HD). Output is MP4, rendered on Remotion Lambda, and costs 2 credits.
For the vertical cut, open Settings, switch the project’s Aspect Ratio to 9:16 Portrait, and export again — your titles and captions reflow with the new frame.
How Reference Images Keep Everything Consistent
Consistency is the reason this technique works at all, and it operates in two directions at once.
Identity lock. The Character reference keeps your presenter the same person in every shot. These two frames are twelve seconds apart, in different rooms, at different focal lengths — same face, same hair, same blazer, same trousers:
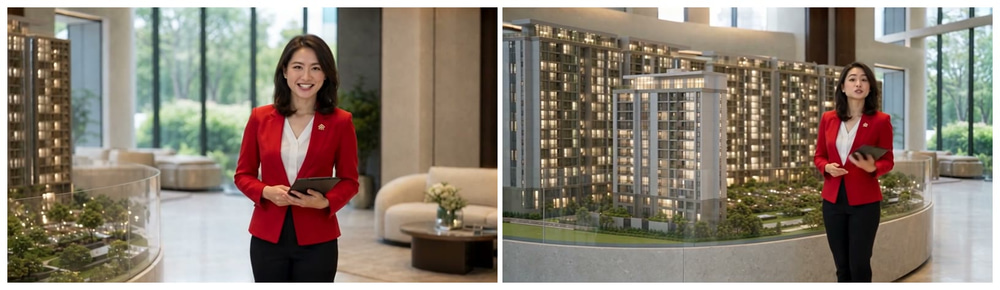
Architecture lock. The Object references keep the building honest. Without them, a text-to-video model invents a plausible-looking condominium — which is worthless, because it is not the one you are selling. With them, the tower count, the balcony rhythm, the pool shape and the landscaping stay as drawn.
Reinforce it in the prompt with a line like: Preserve the architecture, towers, pool, landscaping and surroundings exactly as shown. No warped facades, altered tower count, duplicated balconies, enlarged pool or invented structures.
Getting the Voice-Over Right
Seedance 2.5 generates the audio with the video, which is what makes a one-take 30-second film possible. A few things worth knowing:
- Keep lines short. A four-second beat holds about 12 to 15 words. Write for the clock, not for the page.
- Mark who is speaking. Use
Agent audio:when the presenter is on screen and should lip-sync, andAudio VO only:for narration over a building shot. Mixing them up gets you a disembodied voice or a talking aerial. - Describe the music once, at the end. Something like
Refined piano and airy synth, building gently and resolving warmlyis enough. - Spell out numbers. Write
920 dollars, not$920— symbols invite the model to put them on screen.
Other Angles for the Same Technique
The beat-sheet-plus-references method is not limited to condo launches. The same setup covers:
- Land and townhouse subdivisions — masterplan render, streetscape render, one show-home interior.
- Commercial and office pre-lease — swap the lifestyle beat for a floorplate and amenity beat, and the presenter for a leasing manager.
- Renovation and flip “after” videos — animate the designer’s render before a single wall comes down.
- Agent recruitment and brand films — the presenter workflow with no property references at all.
- Multi-language launches — regenerate with translated voice-over lines and keep every visual instruction identical.
For finished homes you can actually photograph, the workflow is different and simpler — see our guide on how to make real estate videos with AI from listing photos.
Turning One Video Into a Campaign
The 16:9 file is your master. Everything else comes from it:
- Vertical cut for Reels, Shorts and TikTok — switch the editor project to 9:16 Portrait and export again, or regenerate at 9:16 with the same prompt. Regenerating composes better, because the model frames for the aspect ratio; switching in the editor is instant and costs no extra generation credits.
- 15-second paid cut — drop the connectivity and value beats and keep opening, presenter, lifestyle, finale.
- Silent social version — the reason you left negative space. Generate captions from the voice-over (Step 6) so the message survives autoplay on mute.
- Stills — export frames for carousels and email headers.
Before You Publish: A Real-Estate Checklist
AI output needs a compliance pass that ordinary footage does not. Watch the file at full size, twice, and check:
- Count the towers and floors against the approved renders.
- Scan every corner for text. The garbled watermark above survived a prompt that explicitly banned it.
- Check the presenter’s clothing for invented badges or logos. Our demo asked for a plain blazer and the model still added a small lapel ornament — harmless here, but it would not be if it resembled a real agency’s mark.
- Check hands and faces in the presenter beats.
- Add your “Artist’s impression” disclaimer in editing, as your local advertising rules require.
- Verify every claim in the voice-over against approved developer material before it goes out.
If a beat is wrong, you do not have to regenerate blindly — edit that beat’s block in the prompt and leave the rest untouched. That is the practical advantage of a timestamped prompt: it is debuggable.
Frequently Asked Questions
Can I make a video of a building that has not been built?
Yes — that is exactly what this workflow is for. You supply the architect’s renders as Object references and the model animates them with camera movement, moving skies, water and people, without changing the architecture.
How much does a 30-second AI property video cost?
210 credits with Seedance 2.5 Turbo Reference at 720p, or 221 credits at 1080p. The standard Seedance 2.5 Reference tier costs 360 credits for the same 30 seconds at 720p.
How long does it take to generate?
A few minutes for the render itself. Realistically, budget about twenty minutes end to end including writing the beat sheet, gathering references and reviewing the result.
Why can’t I put the project name and price in the video?
You can — just not with the video model. AI video still renders text as unreadable gibberish, so ban it in the prompt and add every title, price and phone number afterwards in the AI Video Editor, where you control spelling and legal disclaimers.
Can I add subtitles or captions to the video?
Yes. The AI Video Editor transcribes the video’s own voice-over and produces word-by-word animated captions, with six style presets and an editable transcript. It costs 1 credit per clip, and Auto-detect covers 30 languages.
How many reference images can I use?
Up to 30 with the Seedance 2.5 Reference models. For a launch film, five to eight works best — more than that gives the model competing looks to reconcile.
Will the presenter look the same throughout the video?
Yes, if you attach their photo as a Character reference and restate their appearance in the prompt. The whole 30 seconds is generated as one take, which helps identity hold.
Can I use my real agent instead of a generated one?
Yes. Upload a clean three-quarter photo as the Character reference. Get their written consent first — a synthetic version of a real person speaking marketing claims is exactly the kind of thing you want documented.
Does it generate the voice-over too?
Yes. Seedance 2.5 generates dialogue, narration and music together with the video, with the presenter lip-syncing their lines. There is no separate voice-over step.
Is Seedance 2.5 available on the Free plan?
No. The Seedance 2.5 models require a paid plan and will appear locked in the model list on Free.
Can I use these videos commercially?
Yes, on any paid plan. Check our terms for details, and make sure you hold the rights to the source renders you upload — those usually belong to the developer or architect.
Make Your First Launch Video Today
The pitch for a new development has always been an act of imagination: you ask a buyer to picture something that isn’t there. For the first time, you can hand them the picture instead — a real 30-second film, in an afternoon, from the same five renders that have been sitting in your marketing folder.
Gather your renders, write the beat sheet, ban the text, and open the AI Video Generator. Then finish it in the AI Video Editor — titles, captions and a vertical cut for social.